Installation Guide to CWDM MUX/DEMUX System
Coarse Wavelength Division Multiplexing (CWDM) is a wavelength multiplexing technology for access networks. It is designed to increase fiber optic network capacity without adding additional fibers. The wavelengths of CWDM channels range from 1270nm to 1610nm with 20nm spacing, which allows the use of cost-effective lasers. CWDM MUX/DEMUX system is a passive, optical solution to increase the flexibility and capacity of existing fiber lines in high-speed networks. By adding more channels into available fibers, the CWDM MUX/DEMUX system enables greater versatility for data communications in ring, point-to-point, and multipoint topologies for both enterprise and metro applications.
All CWDM system components are passive and require no power supplies. They consist of the rack mount chassis, a set of CWDM MUX/DEMUX and CWDM OADM (Optical Add/Drop Multiplexing) modules with color-coded ports. The CWDM MUX/DEMUX takes 4 or 8 different wavelength channels and multiplexes them onto one common fiber cable for transmission to the network. Then it demultiplexes the channels it receives from the network and sends each channel to a different device. Multiple modules may be chained through the expansion port on the four-channel modules. Thus it increases flexibility and enables growth for evolving networks.
The CWDM OADM module can add or drop CWDM channels into an existing backbone ring. It provides the ability to drop one CWDM channel from the network fiber, while allowing all other channels to continue pass to other nodes. Similarly, the drop/insert module removes an individual channel from the network fiber, however, it also provides the ability to add that same channel back onto the network fiber. The drop/insert module supports two paths (east and west) for dropping and adding, so that network viability is maintained in a ring topology, even if a break occurs in the ring.
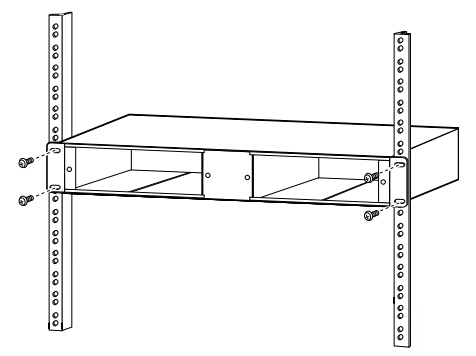
Step1: Mount the system chassis on the rack. The CWDM rack-mount chassis can be mounted in a standard 19-inch cabinet or rack. Make sure that you install the rack-mount chassis in the same rack or an adjacent rack to your system so that you can connect all the cables between your CWDM MUX/DEMUX modules and the CWDM SFP transceivers.

Step2: Install the CWDM MUX/DEMUX modules. First loose the captive screws on the blank of module panel and remove the panel. Then align the module with the slot of the chassis shelf and gently push the module into the slot. Finally, ensure that you line up the captive screws on the module with the screw holes on the shelf and tighten them up.

Step3: Install CWDM SFP transceivers. Since each channel has a specific wavelength, transceivers must comply with the right wavelengths. Each wavelength must not appear more than once in the system. Device pairs must carry transceivers with the same wavelength.
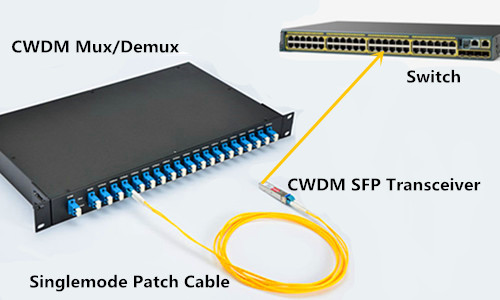
Step4: Install the CWDM MUX/DEMUX to the switch. After inserting the CWDM SFP transceiver into the switch, single-mode patch cables are used to connect the transceiver to the CWDM MUX/DEMUX module.

Step5: Connect the CWDM MUX/DEMUX pairs. In a CWDM MUX/DEMUX system, multiplexer and demultiplexer must work in pairs. Two strands of single-mode patch cables are needed in the duplex MUX/DEMUX module and one strand for the simplex one. Simply insert single-mode cables from your system equipment to the appropriate port on the CWDM MUX/DEMUX or OADM module.
CWDM MUX/DEMUX system is an attractive solution for carriers who need to upgrade their networks to accommodate current or future traffic needs while minimizing the use of valuable fiber strands. With CWDM technology, you can accommodate Ethernet and SONET on a single fiber that enables converged circuit/packet networks at high demand access sites. Besides, CWDM MUX/DEMUX can work seamlessly with transceivers to optimize link length, signal integrity and network cost, thus becoming a single rack-mount solution for enhanced design, power and space efficiency.
Source: http://www.china-cable-suppliers.com/
Post Your Ad Here
Comments