How to Use a TUSY Heat Pres

In the world of DIY crafts and custom apparel, the TUSY heat press is something new. Whether you want to launch your own line of personalized t-shirts, create unique gifts, or even start a small business, mastering the art of heat press printing will open up a world of possibilities.
Known for its reliability, versatility and user-friendly interface, the TUSY heat press is favored by beginners and seasoned professionals alike. But as with any tool, knowing how to use it effectively is key to unlocking its full potential and achieving professional-quality results.
In this article, we'll walk you through the entire process of using the TUSY heat press, from setting it up to applying your first pattern with precision and accuracy. We'll cover material selection, pattern preparation and the step-by-step pressing process, ensuring that even the most intricate details are perfectly captured on your chosen medium.
Plus, we'll provide professional advice and troubleshooting tips to help you overcome typical challenges so that your projects turn out exactly as you envisioned them - or even better. So, let's warm up the press and dive into the colorful, out-of-the-box world of thermal transfer printing!
Unboxing and Assembly
- Unboxing Your TUSY Heat Press
- The excitement of unboxing the TUSY Heat Press is just the beginning. I meticulously checked that all parts were present and accounted for, including the main press, heating plate, silicone pad, and instruction manual. It's crucial to ensure nothing is missing or damaged right from the start. Setting up in a stable, well-ventilated area is equally important, as it sets the stage for safe and efficient operation.
- Assembly Instructions
- Fortunately, the TUSY Heat Press requires minimal assembly. The main task was attaching the heating plate to the base, a straightforward process guided by the clear instructions provided. Ensuring everything was tightly secured, I prepared my workspace, keeping it free from clutter and within reach of an electrical outlet.
Getting to Know Your TUSY Heat Press - Overview of Parts
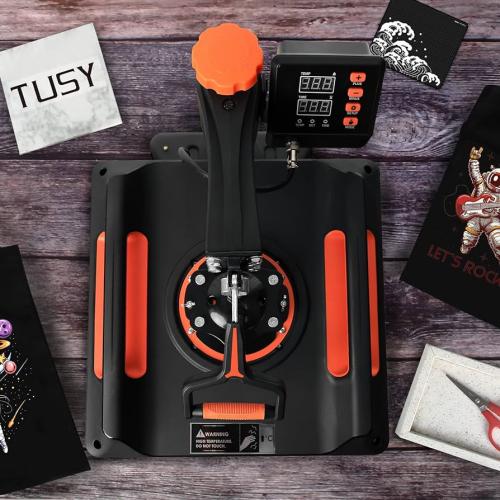
- Familiarizing myself with the heat press's parts was my next step. Understanding the function of each component, from the digital control panel to the pressure adjustment knob, silicone pad, and heating plate, was essential. This knowledge laid the foundation for using the machine effectively and safely.
- Understanding the Control Panel
- The digital control panel, the command center of the TUSY Heat Press, was simpler to navigate than I anticipated. Learning how to set the temperature, timer, and pressure accurately for different materials and designs was pivotal. This ensured that each project started on the right foot, with settings tailored to the specific needs of the fabric and transfer paper.
- Preparing Your Materials
- Choosing the Right Materials
- Selecting suitable materials and transfer papers was my next challenge. I experimented with various fabrics and paper types to understand their interactions with heat and pressure. This experimentation was vital, as it allowed me to achieve optimal results across different projects.
- Preparing Your Design
- Design preparation involved more than just creativity; it required technical consideration, such as reversing the image for transfer and selecting high-quality graphics. My initial trials taught me the importance of print quality and image resolution, which directly influenced the final product's appearance.
- Heat Pressing Process
- Positioning Your Material
- Positioning the fabric and transfer paper correctly was crucial for a professional finish. I learned to carefully align the design on the material, ensuring it was straight and centered. This step might seem minor, but it significantly impacts the project's overall look.
- Setting the Heat Press
- Setting the appropriate temperature, time, and pressure for each material and design was a learning curve. Through trial and error, I found the sweet spot for various projects, which was key to avoiding issues like under or over-pressing.
- The Pressing Process
- The actual pressing process was exhilarating. Closing the heat press, starting the timer, and then carefully opening it to reveal the design felt like magic. I quickly learned the importance of safety, using heat-resistant gloves and keeping my hands clear of the heated plates.
- After Press Care
- Peeling off the Transfer Paper
- Peeling the transfer paper off at the right time—whether hot or cold—affected the design's quality. I experimented with both methods to understand their effects on different types of transfer papers and designs.
- Caring for Your Pressed Items
- Post-press care was crucial for longevity. Washing and caring for the items properly ensured the designs remained vibrant and intact over time. This step is often overlooked but essential for professional-quality results.
- Maintenance and Troubleshooting
- Regular Maintenance
- Regular maintenance, such as cleaning the plates and inspecting the machine for loose components, kept my TUSY Heat Press in top condition. I learned that a well-maintained press is more reliable and produces better results.
- Troubleshooting Common Problems
- Encountering and solving common issues, like uneven pressure or incorrect temperature readings, improved my understanding and skill. Sharing these solutions here aims to help you navigate these challenges smoothly.
Conclusion
My journey with the TUSY Heat Press has been both enlightening and deeply rewarding. Not only did I learn the intricacies of heat press printing, but I also gained the confidence to push my creative boundaries further than I ever imagined. Through trial and error, I unlocked the secrets to producing professional-quality custom apparel and crafts, something that seemed daunting at the outset.
Turning to the experiences of others, I found that TUSY Heat Press reviews echoed my sentiments, highlighting the machine's reliability, ease of use, and excellent value for money. Many users praised its consistent performance across a wide range of projects, from t-shirts and tote bags to more intricate designs on hats and mugs. The community's tips and shared experiences provided invaluable insights, helping me avoid common pitfalls and enhance my technique.
Comments