How to Create Animation Story Videos: A Step-by-Step Guide
Creating animation story videos is a fantastic way to engage audiences, communicate ideas, and tell compelling stories in a visually captivating manner. Whether you're a content creator, educator, or marketer, animation story videos can help you reach your audience more effectively. In this guide, we’ll explore the process of creating animation story videos, from conceptualization to final production. By the end, you'll have a clear understanding of how to bring your stories to life with animation.
1. Understanding the Basics of Animation Storytelling
Before diving into the technical aspects of creating animation story videos, it’s essential to understand the basics of storytelling. A good story forms the foundation of any successful animation. It should have a clear structure with a beginning, middle, and end. This structure helps keep the audience engaged and ensures that your message is conveyed effectively.
Key Elements of a Story:
Characters: Create relatable and well-developed characters. They are the heart of your story and should resonate with your audience.
Plot: Your plot should have a clear conflict or problem that needs to be resolved. This creates tension and drives the story forward.
Setting: The setting is where your story takes place. It could be a real-world location or an entirely fictional universe.
Theme: The theme is the underlying message or lesson of your story. It’s what you want your audience to take away from the video.
2. Brainstorming and Scriptwriting
Once you have a basic story idea, the next step is to brainstorm and write a script. The script serves as the blueprint for your animation. It outlines the dialogue, actions, and scenes in your story.
Tips for Writing a Script:
Keep it Simple: Especially if you’re new to animation, start with a simple story. Complexity can lead to longer production times and potential confusion.
Be Descriptive: Since animation is a visual medium, use descriptive language to convey the scenes and actions.
Focus on Dialogue: Write natural-sounding dialogue that fits your characters and the tone of the story.
Edit and Revise: Don’t be afraid to revise your script multiple times. The first draft is rarely perfect.
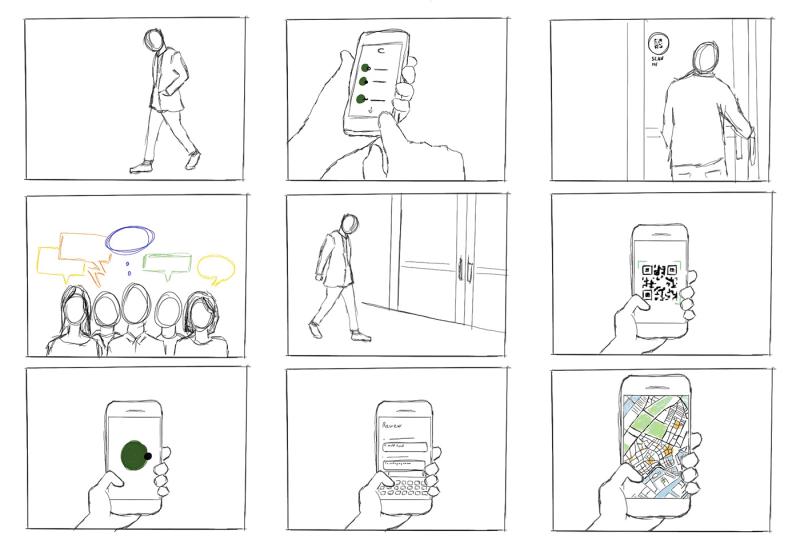
3. Storyboarding Your Animation
After finalizing your script, it’s time to create a storyboard. A storyboard is a visual representation of your script, similar to a comic strip. It helps you plan the sequence of scenes, camera angles, and movements.
Creating a Storyboard:
Divide Your Script: Break your script down into scenes and shots. Each shot will correspond to a frame in your storyboard.
Sketch the Frames: You don’t need to be an artist to create a storyboard. Simple sketches that illustrate the action and camera angles will suffice.
Add Notes: Include notes about the scene, such as character movements, sound effects, or background music.
Use a Storyboard Tool: To make this process easier, you can use an AI storyboard generator free tool. These tools can help you create storyboards quickly, even if you lack drawing skills.
4. Choosing the Right Animation Software
With your storyboard ready, the next step is to choose animation software. The right software will depend on your skill level, budget, and the complexity of your project.
Popular Animation Software:
Adobe Animate: A professional-grade tool ideal for 2D animation. It offers a wide range of features but has a steeper learning curve.
Toon Boom Harmony: Another industry-standard software used by professionals, particularly for traditional frame-by-frame animation.
Blender: A free, open-source software that’s great for 3D animation. It’s powerful but may require some time to learn.
Animaker: A user-friendly, cloud-based tool designed for beginners. It’s perfect for creating animated explainer videos.
5. Animating Your Story
Now comes the most exciting part—bringing your story to life through animation. The process will vary depending on the software you choose, but the general steps remain the same.
Steps to Animate:
Import Your Assets: Begin by importing any characters, backgrounds, and other assets into your animation software. You may need to create or source these assets beforehand.
Create Keyframes: Keyframes are the frames where significant changes occur in your animation, such as a character moving or a scene transitioning.
In-betweening: Once your keyframes are set, create the in-between frames to ensure smooth transitions. Some software offers automatic in-betweening to speed up this process.
Add Special Effects: Enhance your animation with special effects like lighting, shadows, and particle effects.
Synchronize Audio: Import your dialogue, sound effects, and background music. Synchronize the audio with the animation to ensure everything lines up perfectly.
Preview and Adjust: Continuously preview your animation to check for any errors or areas that need improvement.
6. Editing and Finalizing Your Video
After completing the animation, the next step is to edit and finalize your video. Editing involves refining your animation, adjusting timing, and adding finishing touches.
Editing Tips:
Trim Unnecessary Parts: If there are any unnecessary frames or scenes, trim them to keep your video concise and engaging.
Adjust Timing: Ensure that the timing of each scene and action flows smoothly. Avoid making the animation too fast or too slow.
Add Transitions: Smooth transitions between scenes can enhance the overall flow of your video.
Apply Color Correction: Adjust the colors and lighting to give your video a polished look.
7. Exporting and Sharing Your Animation
Once your animation is edited and finalized, it’s time to export and share it with the world.
Exporting Your Video:
Choose the Right Format: Export your video in a format that suits your intended platform, such as MP4 for YouTube or GIF for social media.
Optimize for Web: If you plan to upload your video online, make sure it’s optimized for web playback, with a balance between quality and file size.
Test Your Video: Before sharing, watch the video on different devices to ensure it looks and sounds as intended.
Sharing Your Animation:
Social Media: Platforms like YouTube, Instagram, and TikTok are perfect for sharing animated content.
Website: Embed your animation on your website to engage visitors and enhance your content.
Presentations: Use your animation in presentations to make them more dynamic and memorable.
8. Promoting Your Animation Story Video
Creating an animation story video is just the beginning. To maximize its impact, you need to promote it effectively.
Promotion Strategies:
SEO Optimization: Optimize your video title, description, and tags with relevant keywords. For instance, if you're creating storyboards using an AI storyboard generator free tool, mention this in your description to attract viewers interested in animation tools.
Social Media Marketing: Share your video across all your social media channels. Encourage your audience to like, comment, and share.
Email Campaigns: If you have an email list, send out a newsletter featuring your new animation video.
Collaborations: Collaborate with other content creators or influencers to expand your reach.
Conclusion
Creating animation story videos is an intricate yet rewarding process that allows you to communicate ideas in a visually compelling way. By understanding the basics of storytelling, scriptwriting, and storyboarding, and by utilizing tools like an AI storyboard generator free, you can streamline your workflow and bring your stories to life with animation. With the right software, a bit of creativity, and a solid promotional strategy, your animated stories can captivate audiences and achieve your goals